 Search
Guide to F2P Dungeoneering for Combaters
2 posters
Page 1 of 1
![]()
 Guide to F2P Dungeoneering for Combaters
![]() by Khan Sat May 04, 2013 5:36 pm
by Khan Sat May 04, 2013 5:36 pm
Note: This guide was rewritten in 2015 by Redefinition, who has edited it and kept it up-to-date since. Please contact Redefinition via these forums, Discord (Redefinition #0662) or in-game if you have any questions regarding this guide.
Guide to F2P Dungeoneering for Combaters
Table of Contents
Glossary
Combater/Combatant (cb): A player who combats the dungeon.
Skiller (sk): A player with a combat level less than 6 (note that this definition is solely for DG purposes).
2cb3sk: 2 combatants and 3 skillers, ie. a full party.
Complexity 6 (C6): The highest complexity of a dungeon, and the most efficient choice for all F2P DG.
5:3 = Party size of 5, with a difficulty of 3 (ie. the dungeon is designed to be completed by 3 players).
5:5 = Party size of 5, with a difficulty of 5.
Critical path (crit): All rooms and paths that lead to the boss.
Bonus path (bo, bon): All rooms and paths that are entirely separate from the critical path (ie. rooms that do not lead to the boss).
Click --->here<--- for a more detailed list of Dungeoneering lingo.
1. Introduction
Over the years, I’ve been Dungeoneering in both F2P and P2P and I’ve decided to share my experience in a written guide. This guide is written for the F2P Dungeoneer who is familiar with the basic concepts of Dungeoneering, and wants to build upon existing knowledge in order to reach optimal experience rates and improve Dungeoneering ability.
The main focus of this guide is on maximizing the Dungeoneering experience per hour. In order to maximize the XP/h you have to be familiar with pathing, gating, and map-reading techniques. This guide will cover basic topics like binds, abilities, and gatestone placements, as well as more advanced topics such as map-prediction and decision-making.
2. Basics
2.1 Requirements
Technically there are no requirements to complete a dungeon, but DGing efficiently requires the use of the 2cb3sk party format. The L0lf2p Friends chat organizes runs using this format. Click here for everything you need to know about F2P DG with the L0lf2p Friends chat.
For 5cb floors, combatants must meet the same requirements as with 2cb3sk floors, with the addition of 49+ Strength, Magic, Prayer, and Ranged.
2.2 Party Setup
Refer to the L0lf2p thread here for the most efficient party setups and sets of floors.
In addition to 2cb3sk floors, 5cb floors are considered somewhat efficient, but they are more difficult to organize.
Finally, there are some inefficient floors that are often hosted. These floors will not be tackled in this guide:
5:3 Ragequits: 2cb3sk floors (generally larges) specifically for record-hunting
5:5 Ragequits: 5cb floors (generally larges) specifically for record-hunting
2.3 Binds and Abilities
Magic has the highest damage-per-second (DPS) on the majority of monsters in F2P Dungeoneering.
Below is the optimal bind setup* for 2cb3sk floors:
Dual-wield magic (Thigat wand/Soulbell orb), and 2h melee (Argonite 2h or maul).

*Note that these are the optimal binds obtainable by purely free-to-play players. Members can also obtain and bind the Thigat staff for use on high-HP bosses.
The wand and orb are to be used together for Guardian doors, as well as bosses (with a few exceptions).
Firstly, melee is used when the Astea Frostweb boss uses the overhead Protect from Magic prayer.
Magic should be used as the primary style against high HP bosses, with a prioritization of the Wild Magic and Asphyxiate threshold abilities. 2h melee is used to make the best melee threshold abilities available during the cooldown of the magic counterparts. Slaughter, Quake, Assault, and Hurricane are all useful.
Note: It is important that you auto-cast a blast spell with both your wand AND your orb. This option is found when selecting Auto-cast in your spellbook (see below). When using a Thigat wand, spell damage for all blast spells (Air/Water/Earth/Fire) are equivalent. A brief explanation of why this is the case can be found in a spoiler below for those interested.
Selecting auto-cast for main-hand and off-hand weapons:

It is also recommended to set the Mystic Might and Overcharge prayers as quick-prayers for convenience. Up to 125 Cosmic runes should be bound as ammo for the Create Gatestone spell.
The most efficient order of abilities to build up adrenaline in 2cb3sk DG is: Auto-cast - Chain - Wrack - Other basic abilities* - Wrack - etc...
By alternating Wrack with auto-casts (regular blast) and other abilities, high damage is dealt and adrenaline builds up efficiently. The use of a wand and orb increases the speed of auto-cast, which will thus increase DPS on the low-levelled monsters in 2cb3sk DG.
*Other basic abilities depend on the situation. If the room is still packed with NPCs, Dragon Breath may be used (multi-target ability) to kill several at once. Otherwise, Combust or Concentrated Blast can be used to kill the leftovers.
Here is an optimal dual-wield Magic action bar for 2cb3sk F2P DG:

Against bosses, you should only fire Chain (and if on cooldown, Wrack) when all other basic abilities are on cooldown. In 5cb Guardian door rooms, use the same rotation in the action bar above, except without Wrack. Replace Concentrated Blast with Impact.
*Note: As of August 2017, the "Surge" and "Barge" abilities are free-to-play. These abilities, while adding no damage, are extremely useful as they allow the player to instantly move up to 10 tiles ahead. Thus, even though they add nothing to DPS calculations, it is crucial that the player has Surge and Barge somewhere on their action bar(s).
1. Chain: Deals damage to 2 additional targets for 100% of your spell damage. Try to use this ability as soon as possible in packed guardian door rooms. Second least priority basic ability vs. bosses.
2. Wrack: Deals up to 94% active spell damage and 188% damage against stunned opponents. Use this ability as your basic/alternating ability. Least priority basic ability vs. bosses.
3. Dragon Breath: Deals up to 188% active spell damage on your target, as well as on targets in a 3x3 radius of the targeted NPC (requires that you are in close proximity). It can also be used from a distance, killing up to 2 NPCs in the line of sight. Use this when Chain is on cooldown, but NPCs are in an ideal formation to be killed.
4. Combust: Applies a damage overtime effect to the target, dealing 100-188% spell damage for 6 seconds. Damage doubles if the target moves. Use this ability for NPC’s with higher Life points, mostly bosses.
5. Concentrated Blast: Hit your target 3x, dealing 75% spell damage, increasing by 7% each hit. Use this mostly on NPC's with higher LP.
6. Wild Magic: Fire 2 "unpredictable" hits at your target, each dealing between 50% and 215% of spell damage. Use this on bosses whenever you have 50% adrenaline.
7. Asphyxiate: A strong threshold ability that deals damage every 2 seconds for 6 seconds. This binds your target, and initially stuns them for 3.6 seconds. Use for bosses when Wild Magic is on cooldown.
8. Omnipower: An ultimate ability which deals 200-400% damage of your spell. Use this against bosses when thresholds are recharging and your adrenaline is full.
Freedom: Breaks free of any stuns or snares. Use this when you get bound by a mage. This is most useful for when you are bound by certain bosses.
Keep in mind that the binds and ability section was written assuming optimal binds and combat stats.
2.4 The Keyer/Tooler System
In F2P Dungeoneering, an efficient party will consist of two combatants and three skillers. These two combatants have separate roles: one of them is the keyer, while the other is the tooler. The two combatants swap roles during the floor depending on who is holding the group gatestone.
A combatant takes the role of a keyer when they are holding the group gatestone. At the start of the floor the keyer is the leader (the red arrow on the map). Keyers are responsible for rushing straight out of the base, gating home, and carrying the group gatestone. Running and opening to doors on the critical path is their main priority. Because the most important aspect of the keyer is pathing speed, keyers should not waste time picking up keys, clearing GD's or doing puzzles unless it is critical, 1-way, or a solo path. Because keyers carry the group gatestone, it is preferable that they are the ones that find the boss, and drop the group gatestone at the end ladder for skillers to end. The faster or more skilled combatant should be the keyer.
Because keyers rush straight out of home, having Cosmic runes bound and gating home is a must. As of August 2017, there is a new Dungeoneering reward available for 50k tokens: the Scroll of quick teleportation. This allows anyone (combatant and skiller alike) to cast a "quick" version of the Home teleport spell (inside Dungeoneering only) when not in combat. This effectively works as a permanent home gate, meaning keyers can gate any significant paths they find after leaving the base.
"Tooler" is derived from the pre-toolbelt days where combatants bought a toolkit and Rune essence before leaving the base. Nowadays, the tooler is more of an assisting role - instead of focusing on the larger paths, a tooler will usually play “clean-up” for the keyer. A combatant takes the role of a tooler when they are not holding the group gatestone. Due to the nature of bonus paths, it is especially important for toolers to quickly finish small branches before continuing the larger paths. Toolers are also responsible for picking up keys (when both combatants are on the same path) - the keyer rushes to the door while the tooler picks up a key. This not only speed things up, but is also necessary in awkward room layouts where there is a wall separating the door from the key. Note that if the keyer and tooler are not on the same path, the keyer will pick up keys for themselves.

Here the keyer (white square) rushes to the door and the tooler (green dot) picks up the key (red dot). The tooler can teleport to the keyer as he is holding the group gatestone.
Unless the dungeon is a one-way, toolers should almost never be on the same path as keyers. It is also preferred that toolers have either Cosmic runes or Law runes bound, and create the type not bound at the start of each floor (along with purchasing feathers). Alternatively, if the Scroll of quick teleportation is unlocked, toolers can ask for skillers to make their Law runes in addition to the keyer's Law runes. Toolers should be gating key doors that are far from the keyer's path, critical rooms preferred. Again, the tooler should not be the only one doing GD's, puzzles, and picking up keys. The keyer is equally responsible should these show up on his own path.
Remember that we are seeking maximum XP/h, so bonus rooms are vital. For record-hunting floors, the tooler should make similar decisions as the keyer based on the critical path.
A Note on Skillers
It is highly recommended that skillers take the initiative to path the dungeon, after making laws. Skillers can do everything except Magic, Strength, Prayer, and guardian doors, and charging magical construct / activating lodestone crystals. Skillers should path only when the floor is in its early stages - if a significant portion of the rooms are opened, skillers should cast the Home teleport spell and be ready to end. Once again, the Scroll of quick teleportation is extremely useful here.
3. Map Reading
3.1 Introduction
The map is the most important tool in helping you organize your team and predict what path to run next. The icons on the map represent the players: Red is the 1st, Blue 2nd, Green 3rd, Yellow 4th and Dark green 5th. As of August 2017, clicking the map once will cause it to display permanently on the screen. This allows you to see the floor layout in real-time. Clicking again will close the map.

In general:
1. A path can have forks, but paths can never connect.

2. Paths tend to go straight and parallel paths tend to compete.
Paths tend to go straight:
And parallel paths tend to compete:

This means that, usually, the path with the most open space will cut off the other parallel path.
3. The chance for a path to reach a certain place depends on the number of minimal turns the path has to make to reach that place.

To reach the cross, the west path only needs to turn once while the east path has to turn twice. The chance the west path will reach the cross is therefore larger than the chance the east path will.
In general, using the map allows the keyer to run the path which will most likely have the most doors. By having the group gatestone on the larger critical path, the paths around it will remain active and the group gatestone will be moved less frequently. Generally, the group gatestone should be carried on the largest critical path and the other teammates should branch out smaller paths of the map. However, once the floor is nearing completion, the boss is usually found in rooms that are guaranteed / very likely to be dead ends - so the keyer's priorities will shift towards the end of the floor.
3.2 Identifying Map and Path-sizes
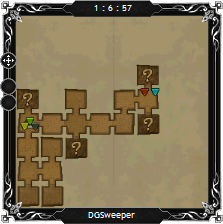
Map and path-size identification are crucial for group gatestone placement. A good way of determining path-sizes is by analysing the total area a path can cover. By comparing these areas, a good prediction of the path lengths can be made. In this guide, the keyer is the red arrow on the map and the tooler is the blue arrow.
Example 1:
Given this map:

Keeping in mind that paths tends to go straight and don’t cross, the north path will most likely be larger than the south path. An example of a first prediction of the path-sizes would be:
For this reason it would be wise for the keyer to take the north path. This example makes clear that reading the map at the start of a floor is important. If the group gatestone is on the correct path, it saves the need to move it, thus saving time.
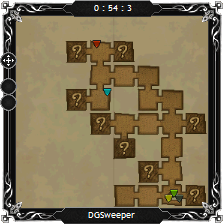
Example 2:

Here both the keyer and the tooler are on the same path. By map analysis, the south path is the only door going south at this point, and will most likely be the larger path. For this reason, the keyer goes south. An example of a good prediction of the path length is the following one:
Example 3:
Given this map:

Here the group gatestone should be with the keyer, as that path will expand the most in this situation. It is easy to see that the tooler will most likely dead end soon. An example of a good prediction of the further expansion of the map would be the following one, as parallel paths tend to compete, paths tend to go straight, and paths don’t cross:

The most important things to remember for determining path sizes are:
1. Paths tend to go straight.
2. Paths don’t cross, and parallel paths tend to compete.
3. The total size of the area the path can expand into should be taken into consideration.
3.3 Gating and Group Gatestone Movement
Try to always have a gate. It's always better to have a gate placed than having a free gate the entire floor. Both the keyer and tooler should show initiative to gate doors. The keyer should always try to keep a good gate as they are carrying the group gatestone.
The group gatestone should mainly be carried on the largest critical path. The keyer should keep his gate at the base at the start of a floor, but feel free to break it whenever necessary (recall: the Scroll of quick teleportation should be purchased). The tooler should also gate home, but gate at critical key doors far from the base if there are any. As a general rule, if there is a situation where the keyer and tooler have the same gate, then the tooler should break it first. Communication is important here.
Example 4:

The purple corner door is facing south and the silver diamond door is facing north.

A few seconds later in the floor, the purple corner key is found. The blue rectangle door is 2 rooms east from the base, facing south. Since the larger critical path is east from the base, the keyer asks the tooler to go to the purple corner door. This is a good example of why both combatants should start with a home gate.
Now, the path of purple corner is completed, and the tooler can teleport to the keyer again. The 2 doors at the keyer are purple pentagon and a guardian door, purple pentagon facing north. The tooler decides to gate purple pentagon and breaks their silver diamond and blue rectangle gate. This was a good decision as those two doors were also gated by the keyer. Purple pentagon is also one of the few paths going north and for this reason, will most likely cover a large part of the map.
So the group gatestone is mainly used by the tooler to teleport to an active path. The group gatestone can also be used to cover parts of the map when both the combatants do not have a free gate. Try to keep the group gatestone on the largest critical path, and your gates at smaller ones. The group gatestone should be carried by the combatant who has the most important gate.
3.4 Pathing
An important part of pathing is prioritization. By analysing the map you should determine what the larger and smaller (critical) paths are and open the larger paths first when holding the group gatestone, and the smaller (critical) paths when you are not. If you are alone at multiple big paths when holding the group gatestone, a good option is to drop the group gatestone and run the smaller path first. This saves time and is part of the good decision-making that is expected of a combatant.
Bonus paths are usually smaller and do not branch much. So, by opening the smaller paths in your area first, you can finish paths quickly and avoid taking risks or regating. Opening bonus rooms also increases the XP/h.
Example 5:

Here the tooler (blue arrow) is pathing alone. By map reading, they find that the path east will most likely be bigger than the path south. They open south first to avoid taking risks and/or breaking gates and continue on their path:

Example 6:
This is the same situation as example 4 in 3.3. South of the keyer and tooler is the blue rectangle door. The tooler will teleport to the base and the keyer will be left alone for 2 large paths (north and east). Looking at the map, the east path will most likely be larger than the north one. The keyer decides to drop the group gatestone (and call “cgt east if gt”) and open the north door first.

The keyer gets lucky here and the north path was a dead end. If it wasn’t, the keyer would open the map, identify the path-sizes and decide then what to do next.
So, do small paths first before large paths if you are pathing alone (without the group gatestone) and do larger paths first if you are holding the group gatestone. If you are alone at multiple large paths, it would be beneficial to drop the group gatestone and do the smaller path(s) first.
3.5 The Critical Path
Identifying and predicting the critical path is one of the more challenging aspects of F2P Dungeoneering. But, if you can understand the behaviour of the critical path, you can save a lot of time during your floors and make predictions with high accuracy.
3.5.1 Basic Facts
1. In small floors the critical path is a connected line of 6-8* rooms which lead to the boss. In mediums, this number changes to 10-14* rooms and in larges, 19-23*.
*Boss and base included.
2. All bonus paths diverge from the critical path.
3. Keys found on the critical path can be bonus.
4. It is important to keep the Group gatestone on the critical path as much as possible because, due to its nature (the fact that it is a connected line of rooms), it cannot randomly hit a dead end. Since all bonus branches diverge off of the critical path, it is nice to have the group gatestone there so that these paths can be explored.
5. The experience given by the skill doors and rooms is the level of the door multiplied by 5 with 10 added to it. The equation would be: Experience = (5 x Level) + 10.
6. A critical path ends at a key or boss. Keys at the extreme corners or ends of a critical path are referred to as 'link keys' in this guide.
3.5.2 Critical Path Prediction
There are a few ways to identify the critical path. The first one is by skill doors.
1. Critical Path Prediction by Skill Doors
In F2P Dungeoneering, all skill requirements for a critical room will have an upper limit at the critical level for the skill (explained below), and a lower limit of 9 levels below the critical level. In F2P, skill requirements for doors/puzzles on the critical path are capped at level 49, meaning the critical level range is typically level 40-49, giving experience drops of 210-255 XP.
What is the critical level for a skill in any given party? This depends on the difficulty of the party. For 5:3, for example, the difficulty is 3. So, for any given skill in a 5:3 party, the critical level is the 3rd lowest level in the party from that skill. Typically, in 5:3, non-combat skill requirements on the critical path are level 40-49 (giving 210-255 XP), and combat skill requirements on the critical path are level 1 (giving 15 XP).
Method 1 of predicting the critical path based on skill doors is therefore by looking at the XP drop and seeing whether it falls into the critical XP range you have identified. If it is not within the critical XP range, then it is bonus. If it is within the critical XP range, it may be critical.
As of August 12, 2019, there is a second method of using skill doors to predict the critical path. Method 2 allows you to examine a skill door before opening it to see its level requirement. Then, you can identify whether the skill door is within the critical level range. If not, it is bonus. If so, it may be critical.
For an easy way to calculate and visualize the critical level and XP range for your party (as well as resources, which are discussed below), use this spreadsheet: https://goo.gl/SGiKLN
You can also read a more detailed explanation of calculating the critical level and XP range for any party size and difficulty by opening the spoiler below:
Note that the critical skill requirements can also appear on the bonus path. When you see experience outside of the critical ranges, however, it is guaranteed to be bonus.
2. Critical Path Prediction by Resource Tiers
Recall the definition of the critical level of a skill in any party: in a party with format a:b (ex. 5:3 or 5:5), the critical level in a skill is the bth lowest level in the party for that skill. Ex. In 5:3, the critical Mining level is the 3rd lowest Mining level in the party.
Using this concept, we can figure out what resources can NOT spawn on the critical path in any floor, allowing us to identify bonus rooms.
For an easy way to calculate and visualize the critical levels, XP, and resources for your party, use this spreadsheet: https://goo.gl/SGiKLN
1. Fishing spots: Find the critical Fishing and Cooking levels in the party. The 2 highest tiers of fish they have in common will be the only fish that can appear in fishing spots on the critical path. Ignore T6 fish (Web snippers) for the purposes of this calculation, as they will never spawn on the critical path in F2P.
2. Dinosaurs: If the critical Fletching level in the party is 3 or higher, only Tier 1 dinosaurs (Protomastyx), which are pale yellow in colour, can appear on the critical path. This remains true (in F2P) even after Fletching has become F2P to 99.
It is important to remember that ANY dinosaurs can spawn on the critical path if the critical Fletching level is below 3.
3. Mining nodes: Rocks behave the same way as fish, except with more skills involved. You must look at 4 different skill combinations (below). The 2 highest mutual tiers of each combination separately will determine the only rocks that can appear on the critical path. Notes: If Attack and Strength combinations are at different tiers, it will always spawn the one that is higher and exclude the one that is lower. Ignore T6 rocks (Zephyrium) for purposes of all calculations, as they will never spawn on the critical path in F2P. The skill combinations are:
4. Trees: If the critical Fletching level of the party is 8 or higher, trees work similarly to rocks. You must look at 3 different skill combinations (below). The 2 highest mutual tiers of each combination separately will determine the only trees that can appear on the critical path. Ignore T6 trees (Bovistrangler) for purposes of all calculations, as they will never spawn on the critical path in F2P. (As long as the critical Fletching level is 8 or higher). The skill combinations are:
Note that there are other skills that trees depend on, but they are P2P skills and will always be level 1-5. This means that no matter what your party setup, T1 will always be one of the trees that spawns on the critical path.
It is important to remember that ANY trees can spawn on the critical path if the critical Fletching level is below 8.
5. Wisps: Wisps do not follow a rule in F2P nor in P2P. You cannot recognize the bonus paths by the tiers of wisps found on your path.
Bonus can still do whatever it wants. Choose your combatants and skillers carefully if the party difficulty is set to less than the amount of players.
3. Advanced Critical Path Prediction by Map Analysis
3.6 Bonus Pathing
3.6.1 Basic Facts
1. The reason why F2P Dungeoneers do not open all bonus doors is that they often run into P2P doors.
2. Pathing bonus is generally better XP/h than skipping it.
3. Keys found on bonus paths are guaranteed to be bonus keys.
4. The bonus path is not a connected line of rooms.
5. There are more bonus rooms than critical.
6. All skill requirements and resources can be found on the bonus path.
7. The more a bonus path turns and/or the further it gets from base or the critical path, the sooner it will end.
8. These rooms are always bonus in F2P: ramokee room, hunter ferret, jump lodestone, mining obstacles room and all P2P skills required rooms.
3.6.2 Increasing the XP/h
Small floors
In small dungeons, it is almost always worth doing bonus. It increases the XP/h by a lot and the floor time is relatively unaffected. The keyer should mainly try to stay on the critical path, as they do not have Law runes from the start. The tooler should do bonus only when they are done with their critical path, as it can make the link keys lag behind. Skillers can help as well for pathing in smalls.
Large floors
In large floors, it can be more complex deciding whether or not to do bonus. Generally, it is better XP/h. However, critical keys should not lag behind. For this reason the main focus should be on the critical path. Try to do bonus only when:
1. The critical path is a 1 way. Having 2 combatants do the same path won’t affect the speed by too much. The tooler should keep an eye on the map to see if the keyer needs their help (if they are at multiple paths or call them).
Example 7:
The path at the tooler is bonus. They decided to explore this path, as the critical path is a 1 way at this point.
Some moments later, the keyer called the tooler back as the critical path forked.

2. Another good moment to do bonus paths is when the other combatant is doing bonus. Doing bonus at the same time can be beneficial as keys found on the bonus path can connect to other bonus paths. Doing bonus at the same time will generally increase the XP/h.
3. Also do bonus paths when you are waiting/camping for link keys or for the group gatestone to be moved.
3.6.3 Guide Mode Floors
Turning the Guide Mode setting to ON will reveal the critical paths of a floor. The consequence is a 4 or 5% penalty to the final XP of a floor. You can toggle the setting in the normal party interface (accessed from your ring).
In Guide Mode floors, the critical path is highlighted on the map with a golden tinge, while bonus rooms appear faded and dark:

This presents DG'ers with the opportunity to know exactly which rooms lead to the boss, and which don't. Because the penalty is capped at 5%, this means that Guide Mode floors have plenty of room to be better XP/h than normal floors.
Using Guide Mode to boost XP/h boils down to your prioritization of doors. It is crucial you use the tips of prioritization for small and large floors listed above. Only then will using Guide Mode yield an increase in XP/h.
Keep in mind that simply opening all possible rooms isn't always the fastest XP/h. Bonus rooms are your secondary priority: only open the quick ones. Do not significantly delay the progression of the critical path.
4. Communication
Communication is important during floors. The keyer and tooler must be aware of each other's paths. Key doors should be called. Gates should be stated often and so should distinctions between critical and bonus rooms/paths. Slow rooms and upcoming keys should be mentioned as well. The keyer and tooler should update each other on their paths regularly.
Decisions should be stated as a fact or command. You will waste time asking “Should I gate <key door>?” When multiple people gate something, one person should state that they are (most likely) keeping the gate. When there are disputes in organization, the keyer has the final word, but do not expect the keyer to be the sole decision-maker: it is the tooler's responsibility as well to make logical decisions.
The keyer must be aware of what the second largest path is. The tooler, ideally, should be equally aware in case the group gatestone needs to be moved. If the keyer and tooler are unaware of each other’s paths, it will result in slow floor times. The keyer and tooler must be aware of each other’s paths.
5. Miscellaneous and Credits
5.1 Opening the map
As of August 2017, the map can be opened safely in combat, and will appear permanently on your screen (and update in real-time) until it is disabled by clicking the button again. Your eyes should glance at the map as often as possible without hindering your awareness of the chatbox and your path.
5.2 Risks of Map Prediction
Please note that predictions always have an uncertainty. This guide can help you predict what will most likely happen. There will always be exceptions.
For example, a good prediction based on path-size identification in the following situation is:

This is what happened:

For this reason, a good idea is to always keep a plan B while pathing.
5.3 Links to Guides
This guide was written with the help of the guides linked below.
1. DGS’ Map reading guide: http://www.xp-waste.com/map-reading-pathing-t1315.html
2. Warfare52’s Map predicting guide: http://services.runescape.com/m=forum/forums.ws?98,99,786,65639831
3. F2P Dungeoneering guide by Zerk: https://dgfamily.forumotion.com/t35-f2p-dungeoneering-guide-by-usedtobezerk-ooutdated-pre-eoc
4. F2P Dungeoneering guide for skillers by Person: https://dgfamily.forumotion.com/t1579-new-dungeoneering-guide-for-skillers
5. Dungeoneering Lingo by Redefinition (based on a prior thread by Nr): https://dgfamily.forumotion.com/t2715-dungeoneering-lingo
6. Puzzles by Sonic: https://dgfamily.forumotion.com/t8-dg-puzzles
5.4 Credits
Credit to DGS for publishing their guides, researches and DGSweeper.
Credit to Warfare52 for publishing his comprehensive map prediction guide.
Credit to Nr, UsedToBeZerk, Sonic and Person for publishing their F2P Dungeoneering guides.
Credit to Sonic for writing the keyer/tooler system section.
Credit to Yoodle, Juco, Oski, Nebhet and Minin Cape T for helping me take pictures of the map.
Credit to Amitie, Person and Bird Seed for helping me research dinos.
Credit to Ants The 3rd and Deerk for researching the behaviour of ores/trees on the critical path.
Credit to Redefinition for updating/rewriting the majority of the guide, and continuing to adapt it to game updates since 2015.
5.5 Last Words
Thanks for reading this guide. I hope my English wasn’t too bad and I want to thank everyone in the F2P and P2P Dungeoneering communities who have helped me progress in my Dungeoneering skills and write this guide.
Please post your feedback here: https://dgfamily.forumotion.com/t1605-feedback-to-dg-guide. Any feedback is appreciated.
6. Appendix
6.1 Appendix A: Video - Large run
To illustrate every aspect mentioned in this guide, I recorded myself doing a large run.
If you have any questions or suggestions regarding this guide, contact Redefinition.
Guide to F2P Dungeoneering for Combaters
Table of Contents
- Spoiler:
1. Introduction
2. Basics
[ 2.1 Requirements
[ 2.2 Party Setup
[ 2.3 Binds and Abilities
[ 2.4 The Keyer/Tooler System
3. Map Reading and Predicting
[ 3.1 Introduction
[ 3.2 Identifying Map and Path-sizes
[ 3.3 Gating and Group Gatestone Movement
[ 3.4 Pathing
[ 3.5 The Critical Path
[ 3.6 Bonus Pathing
4. Communication
5. Miscellaneous and Credits
[ 5.1 Opening the Map
[ 5.2 Risks of Map Prediction
[ 5.3 Links to Guides
[ 5.4 Credits
[ 5.5 Last Words
6. Appendix
[ Appendix A: Video - Large run
Glossary
Combater/Combatant (cb): A player who combats the dungeon.
Skiller (sk): A player with a combat level less than 6 (note that this definition is solely for DG purposes).
2cb3sk: 2 combatants and 3 skillers, ie. a full party.
Complexity 6 (C6): The highest complexity of a dungeon, and the most efficient choice for all F2P DG.
5:3 = Party size of 5, with a difficulty of 3 (ie. the dungeon is designed to be completed by 3 players).
5:5 = Party size of 5, with a difficulty of 5.
Critical path (crit): All rooms and paths that lead to the boss.
Bonus path (bo, bon): All rooms and paths that are entirely separate from the critical path (ie. rooms that do not lead to the boss).
Click --->here<--- for a more detailed list of Dungeoneering lingo.
1. Introduction
Over the years, I’ve been Dungeoneering in both F2P and P2P and I’ve decided to share my experience in a written guide. This guide is written for the F2P Dungeoneer who is familiar with the basic concepts of Dungeoneering, and wants to build upon existing knowledge in order to reach optimal experience rates and improve Dungeoneering ability.
The main focus of this guide is on maximizing the Dungeoneering experience per hour. In order to maximize the XP/h you have to be familiar with pathing, gating, and map-reading techniques. This guide will cover basic topics like binds, abilities, and gatestone placements, as well as more advanced topics such as map-prediction and decision-making.
2. Basics
2.1 Requirements
Technically there are no requirements to complete a dungeon, but DGing efficiently requires the use of the 2cb3sk party format. The L0lf2p Friends chat organizes runs using this format. Click here for everything you need to know about F2P DG with the L0lf2p Friends chat.
For 5cb floors, combatants must meet the same requirements as with 2cb3sk floors, with the addition of 49+ Strength, Magic, Prayer, and Ranged.
2.2 Party Setup
Refer to the L0lf2p thread here for the most efficient party setups and sets of floors.
In addition to 2cb3sk floors, 5cb floors are considered somewhat efficient, but they are more difficult to organize.
Finally, there are some inefficient floors that are often hosted. These floors will not be tackled in this guide:
5:3 Ragequits: 2cb3sk floors (generally larges) specifically for record-hunting
5:5 Ragequits: 5cb floors (generally larges) specifically for record-hunting
2.3 Binds and Abilities
Magic has the highest damage-per-second (DPS) on the majority of monsters in F2P Dungeoneering.
Below is the optimal bind setup* for 2cb3sk floors:
Dual-wield magic (Thigat wand/Soulbell orb), and 2h melee (Argonite 2h or maul).
*Note that these are the optimal binds obtainable by purely free-to-play players. Members can also obtain and bind the Thigat staff for use on high-HP bosses.
The wand and orb are to be used together for Guardian doors, as well as bosses (with a few exceptions).
Firstly, melee is used when the Astea Frostweb boss uses the overhead Protect from Magic prayer.
Magic should be used as the primary style against high HP bosses, with a prioritization of the Wild Magic and Asphyxiate threshold abilities. 2h melee is used to make the best melee threshold abilities available during the cooldown of the magic counterparts. Slaughter, Quake, Assault, and Hurricane are all useful.
Note: It is important that you auto-cast a blast spell with both your wand AND your orb. This option is found when selecting Auto-cast in your spellbook (see below). When using a Thigat wand, spell damage for all blast spells (Air/Water/Earth/Fire) are equivalent. A brief explanation of why this is the case can be found in a spoiler below for those interested.
Selecting auto-cast for main-hand and off-hand weapons:
- Damage Scaling for Elemental Spells:
- Elemental combat spells have their maximum damage scaled as you switch between elements (Air/Water/Earth/Fire), spell tiers (strike, bolt, blast, wave, surge), weapon tiers, and Magic level.
Air strike, for example, which requires level 1 Magic, will have its spell damage increase as you level your Magic up to 16, after which it will stop. This is because at level 17, you can access Air bolt (ie. the next spell tier of the same element). Fire strike, on the other hand, requires level 13 Magic, with spell damage increasing until level 34 (since Fire bolt is unlocked at level 35).
Higher elements have higher maximum spell damage then: so Fire strike has a higher maximum spell damage than Air strike. This remains true for Fire blast vs. Air blast. So why are all blast spells equivalent damage when using a Thigat weapon?
The reason is that spell damage caps at the lowest of the following levels: (1) your magic level, (2) the maximum "scaling" level of the spell (ex. 35 for Fire bolt), and (3) the level requirement of the weapon being used.
Looking at Air blast, which requires 41 Magic, we see that it increases in damage until level 61 Magic, since Air wave is unlocked at 62. Water, Earth, and Fire blast increase until 64, 69, and 74 respectively.
But the level of the Thigat wand, 60, will be the cap for all of these spells (since it is lower than their maximum scaling level), effectively making them equivalent.
- DG Without Skillers:
While these floors are not the focus of this guide, the optimal weapon binds are similar to those for 2cb3sk.
For a strictly free-to-play player, the optimal binds are:
Thigat wand/Soulbell orb/Argonite maul/Argonite 2h/Argonite main-hand and off-hand knives (in order of priority)
Those with access to membership should replace the Thigat wand and Soulbell orb with a Thigat staff.
Note: Those with very poor (< 60) melee stats and/or Ranged level can replace those binds with Magic armour instead.
Magic is to be used as a primary combat style for guardian doors and bosses. As before, melee threshold abilities can be used as supplementary DPS against bosses. In guardian door rooms, use your maul for high-levelled NPCs weak to Crush, and your 2h similarly for NPCs weak to Slash. The availability of both a Crush & Slash weapon is very useful for high-levelled NPCs. Use your knives for high-levelled NPCs weak to Ranged.
Optimal ability rotation for 2h Melee:
Optimal ability rotation for dual-wield Ranged:
- Obtaining binds:
If any party member has at least 80 Magic, they can spawn (in their inventory) the Thigat wand and Soulbell orb in a Complexity 1 dungeon. Similarly, 80 Ranged allows you to spawn the main-hand and off-hand Argonite knives.
To obtain the Argonite maul and 2h, one should enter a Complexity 6 (not 1!) floor and check the table. It requires 80 Strength for the maul or 80 Attack for the 2h to spawn the weapons this way.
Repeating the process (ie. exiting and re-entering floors repeatedly) will be necessary to obtain binds - but, if you have the 80+ spawning requirements, then it should be relatively quick.
Another method of obtaining optimal binds can be done without 80+ requirements, and with only the wielding requirements (ie. level 60). This involves killing the bosses that have the desired weapons on their drop table.
Boss drop trick: Getting higher-tier boss drops is most common in parties of 3-5. The difficulty should be set to maximum (ex. 3:3 or 5:5). When the desired boss is found, make sure only 1 person enters the room. This player should solo and kill the boss. The chance of a higher-tiered drop will be increased.
P2P note: For F2P DG, Members can fletch and bind the Thigat staff if they do not have enough free slots.
Easy-to-Obtain Binds
Thigat wand: Attempt floors 1 and 2 until the Astea Frostweb boss is found. Follow the trick above for the best chance at the desired drop. At least one party member must have the wielding requirement (60 Magic) for this drop.
Soulbell orb: Attempt floors 20, 21, and 22 until the Lexicus Runewright boss is found. Follow the trick above for the best chance at the desired drop. At least one party member must have the wielding requirement (60 Magic) for this drop.
Argonite maul: Attempt floors 18 and 19 until the Rammernaut boss is found. Follow the trick above for the best chance at the desired drop. At least one party member must have the wielding requirement (60 Strength) for this drop.
Argonite knives (main-hand and off-hand): Attempt floors 1 and 2 until the Icy Bones boss is found. Follow the trick above for the best chance at the desired drop. At least one party member must have the wielding requirement (60 Ranged) for this drop.
Difficult-to-Obtain
Argonite 2h sword: Do 5cb 5:5 Furnished larges, and kill T60 Forgotten warriors. They are easily identifiable by their Argonite armour, which is dark blue. Only the warriors actually wielding a 2h sword will have a chance at dropping it. There is no skill requirement to receive the drop this way.
- Other Useful Binds:
While the binds above are simple to understand and work with, there are other items that could be bound instead for certain situations:- Soulbell armour - If a player has low Melee and/or Ranged levels, Magic armour might be more useful than extra weapons. You can obtain a Soulbell hood from Lexicus Runewright (F20-22) (requires 60 Defence & Magic to obtain) and the remaining pieces from T60 Forgotten mages. There are no requirements to receive drops from Forgotten mages.
- A shield - The use of a shield bind for the "Revenge" Defence ability might boost overall DPS in some situations. Revenge is a threshold ability that boosts your max hit for 20 seconds, increasing by 10% for each time an NPC hits you. Additionally, other Defence abilities can be used to stall adrenaline from draining, which is especially useful in floors without skillers. Rejuvenate could also be useful here to heal the player (although at a hefty cost to adrenaline).
- Dual-wield Argonite melee weapons - The use of dual-wield melee (rapiers, warhammers, battleaxes) is viable, and some dual-wield abilities are marginally more DPS than 2h melee. However, because this occupies 2 binds, the availability of both a Crush and Slash melee weapon might be lost. As such, these are mostly viable for DG with skillers, where melee is only used for bosses (who have no weakness).
- Soulbell armour - If a player has low Melee and/or Ranged levels, Magic armour might be more useful than extra weapons. You can obtain a Soulbell hood from Lexicus Runewright (F20-22) (requires 60 Defence & Magic to obtain) and the remaining pieces from T60 Forgotten mages. There are no requirements to receive drops from Forgotten mages.
It is also recommended to set the Mystic Might and Overcharge prayers as quick-prayers for convenience. Up to 125 Cosmic runes should be bound as ammo for the Create Gatestone spell.
The most efficient order of abilities to build up adrenaline in 2cb3sk DG is: Auto-cast - Chain - Wrack - Other basic abilities* - Wrack - etc...
By alternating Wrack with auto-casts (regular blast) and other abilities, high damage is dealt and adrenaline builds up efficiently. The use of a wand and orb increases the speed of auto-cast, which will thus increase DPS on the low-levelled monsters in 2cb3sk DG.
*Other basic abilities depend on the situation. If the room is still packed with NPCs, Dragon Breath may be used (multi-target ability) to kill several at once. Otherwise, Combust or Concentrated Blast can be used to kill the leftovers.
Here is an optimal dual-wield Magic action bar for 2cb3sk F2P DG:
Against bosses, you should only fire Chain (and if on cooldown, Wrack) when all other basic abilities are on cooldown. In 5cb Guardian door rooms, use the same rotation in the action bar above, except without Wrack. Replace Concentrated Blast with Impact.
*Note: As of August 2017, the "Surge" and "Barge" abilities are free-to-play. These abilities, while adding no damage, are extremely useful as they allow the player to instantly move up to 10 tiles ahead. Thus, even though they add nothing to DPS calculations, it is crucial that the player has Surge and Barge somewhere on their action bar(s).
1. Chain: Deals damage to 2 additional targets for 100% of your spell damage. Try to use this ability as soon as possible in packed guardian door rooms. Second least priority basic ability vs. bosses.
2. Wrack: Deals up to 94% active spell damage and 188% damage against stunned opponents. Use this ability as your basic/alternating ability. Least priority basic ability vs. bosses.
3. Dragon Breath: Deals up to 188% active spell damage on your target, as well as on targets in a 3x3 radius of the targeted NPC (requires that you are in close proximity). It can also be used from a distance, killing up to 2 NPCs in the line of sight. Use this when Chain is on cooldown, but NPCs are in an ideal formation to be killed.
4. Combust: Applies a damage overtime effect to the target, dealing 100-188% spell damage for 6 seconds. Damage doubles if the target moves. Use this ability for NPC’s with higher Life points, mostly bosses.
5. Concentrated Blast: Hit your target 3x, dealing 75% spell damage, increasing by 7% each hit. Use this mostly on NPC's with higher LP.
6. Wild Magic: Fire 2 "unpredictable" hits at your target, each dealing between 50% and 215% of spell damage. Use this on bosses whenever you have 50% adrenaline.
7. Asphyxiate: A strong threshold ability that deals damage every 2 seconds for 6 seconds. This binds your target, and initially stuns them for 3.6 seconds. Use for bosses when Wild Magic is on cooldown.
8. Omnipower: An ultimate ability which deals 200-400% damage of your spell. Use this against bosses when thresholds are recharging and your adrenaline is full.
Freedom: Breaks free of any stuns or snares. Use this when you get bound by a mage. This is most useful for when you are bound by certain bosses.
Keep in mind that the binds and ability section was written assuming optimal binds and combat stats.
2.4 The Keyer/Tooler System
In F2P Dungeoneering, an efficient party will consist of two combatants and three skillers. These two combatants have separate roles: one of them is the keyer, while the other is the tooler. The two combatants swap roles during the floor depending on who is holding the group gatestone.
A combatant takes the role of a keyer when they are holding the group gatestone. At the start of the floor the keyer is the leader (the red arrow on the map). Keyers are responsible for rushing straight out of the base, gating home, and carrying the group gatestone. Running and opening to doors on the critical path is their main priority. Because the most important aspect of the keyer is pathing speed, keyers should not waste time picking up keys, clearing GD's or doing puzzles unless it is critical, 1-way, or a solo path. Because keyers carry the group gatestone, it is preferable that they are the ones that find the boss, and drop the group gatestone at the end ladder for skillers to end. The faster or more skilled combatant should be the keyer.
Because keyers rush straight out of home, having Cosmic runes bound and gating home is a must. As of August 2017, there is a new Dungeoneering reward available for 50k tokens: the Scroll of quick teleportation. This allows anyone (combatant and skiller alike) to cast a "quick" version of the Home teleport spell (inside Dungeoneering only) when not in combat. This effectively works as a permanent home gate, meaning keyers can gate any significant paths they find after leaving the base.
"Tooler" is derived from the pre-toolbelt days where combatants bought a toolkit and Rune essence before leaving the base. Nowadays, the tooler is more of an assisting role - instead of focusing on the larger paths, a tooler will usually play “clean-up” for the keyer. A combatant takes the role of a tooler when they are not holding the group gatestone. Due to the nature of bonus paths, it is especially important for toolers to quickly finish small branches before continuing the larger paths. Toolers are also responsible for picking up keys (when both combatants are on the same path) - the keyer rushes to the door while the tooler picks up a key. This not only speed things up, but is also necessary in awkward room layouts where there is a wall separating the door from the key. Note that if the keyer and tooler are not on the same path, the keyer will pick up keys for themselves.

Here the keyer (white square) rushes to the door and the tooler (green dot) picks up the key (red dot). The tooler can teleport to the keyer as he is holding the group gatestone.
Unless the dungeon is a one-way, toolers should almost never be on the same path as keyers. It is also preferred that toolers have either Cosmic runes or Law runes bound, and create the type not bound at the start of each floor (along with purchasing feathers). Alternatively, if the Scroll of quick teleportation is unlocked, toolers can ask for skillers to make their Law runes in addition to the keyer's Law runes. Toolers should be gating key doors that are far from the keyer's path, critical rooms preferred. Again, the tooler should not be the only one doing GD's, puzzles, and picking up keys. The keyer is equally responsible should these show up on his own path.
Remember that we are seeking maximum XP/h, so bonus rooms are vital. For record-hunting floors, the tooler should make similar decisions as the keyer based on the critical path.
A Note on Skillers
It is highly recommended that skillers take the initiative to path the dungeon, after making laws. Skillers can do everything except Magic, Strength, Prayer, and guardian doors, and charging magical construct / activating lodestone crystals. Skillers should path only when the floor is in its early stages - if a significant portion of the rooms are opened, skillers should cast the Home teleport spell and be ready to end. Once again, the Scroll of quick teleportation is extremely useful here.
3. Map Reading
3.1 Introduction
The map is the most important tool in helping you organize your team and predict what path to run next. The icons on the map represent the players: Red is the 1st, Blue 2nd, Green 3rd, Yellow 4th and Dark green 5th. As of August 2017, clicking the map once will cause it to display permanently on the screen. This allows you to see the floor layout in real-time. Clicking again will close the map.

In general:
1. A path can have forks, but paths can never connect.

2. Paths tend to go straight and parallel paths tend to compete.
Paths tend to go straight:

And parallel paths tend to compete:

This means that, usually, the path with the most open space will cut off the other parallel path.
3. The chance for a path to reach a certain place depends on the number of minimal turns the path has to make to reach that place.

To reach the cross, the west path only needs to turn once while the east path has to turn twice. The chance the west path will reach the cross is therefore larger than the chance the east path will.
In general, using the map allows the keyer to run the path which will most likely have the most doors. By having the group gatestone on the larger critical path, the paths around it will remain active and the group gatestone will be moved less frequently. Generally, the group gatestone should be carried on the largest critical path and the other teammates should branch out smaller paths of the map. However, once the floor is nearing completion, the boss is usually found in rooms that are guaranteed / very likely to be dead ends - so the keyer's priorities will shift towards the end of the floor.
3.2 Identifying Map and Path-sizes
Map and path-size identification are crucial for group gatestone placement. A good way of determining path-sizes is by analysing the total area a path can cover. By comparing these areas, a good prediction of the path lengths can be made. In this guide, the keyer is the red arrow on the map and the tooler is the blue arrow.
Example 1:
Given this map:

Keeping in mind that paths tends to go straight and don’t cross, the north path will most likely be larger than the south path. An example of a first prediction of the path-sizes would be:

For this reason it would be wise for the keyer to take the north path. This example makes clear that reading the map at the start of a floor is important. If the group gatestone is on the correct path, it saves the need to move it, thus saving time.
Example 2:

Here both the keyer and the tooler are on the same path. By map analysis, the south path is the only door going south at this point, and will most likely be the larger path. For this reason, the keyer goes south. An example of a good prediction of the path length is the following one:

Example 3:
Given this map:

Here the group gatestone should be with the keyer, as that path will expand the most in this situation. It is easy to see that the tooler will most likely dead end soon. An example of a good prediction of the further expansion of the map would be the following one, as parallel paths tend to compete, paths tend to go straight, and paths don’t cross:

The most important things to remember for determining path sizes are:
1. Paths tend to go straight.
2. Paths don’t cross, and parallel paths tend to compete.
3. The total size of the area the path can expand into should be taken into consideration.
3.3 Gating and Group Gatestone Movement
Try to always have a gate. It's always better to have a gate placed than having a free gate the entire floor. Both the keyer and tooler should show initiative to gate doors. The keyer should always try to keep a good gate as they are carrying the group gatestone.
The group gatestone should mainly be carried on the largest critical path. The keyer should keep his gate at the base at the start of a floor, but feel free to break it whenever necessary (recall: the Scroll of quick teleportation should be purchased). The tooler should also gate home, but gate at critical key doors far from the base if there are any. As a general rule, if there is a situation where the keyer and tooler have the same gate, then the tooler should break it first. Communication is important here.
Example 4:

The purple corner door is facing south and the silver diamond door is facing north.

A few seconds later in the floor, the purple corner key is found. The blue rectangle door is 2 rooms east from the base, facing south. Since the larger critical path is east from the base, the keyer asks the tooler to go to the purple corner door. This is a good example of why both combatants should start with a home gate.

Now, the path of purple corner is completed, and the tooler can teleport to the keyer again. The 2 doors at the keyer are purple pentagon and a guardian door, purple pentagon facing north. The tooler decides to gate purple pentagon and breaks their silver diamond and blue rectangle gate. This was a good decision as those two doors were also gated by the keyer. Purple pentagon is also one of the few paths going north and for this reason, will most likely cover a large part of the map.
So the group gatestone is mainly used by the tooler to teleport to an active path. The group gatestone can also be used to cover parts of the map when both the combatants do not have a free gate. Try to keep the group gatestone on the largest critical path, and your gates at smaller ones. The group gatestone should be carried by the combatant who has the most important gate.
3.4 Pathing
An important part of pathing is prioritization. By analysing the map you should determine what the larger and smaller (critical) paths are and open the larger paths first when holding the group gatestone, and the smaller (critical) paths when you are not. If you are alone at multiple big paths when holding the group gatestone, a good option is to drop the group gatestone and run the smaller path first. This saves time and is part of the good decision-making that is expected of a combatant.
Bonus paths are usually smaller and do not branch much. So, by opening the smaller paths in your area first, you can finish paths quickly and avoid taking risks or regating. Opening bonus rooms also increases the XP/h.
Example 5:

Here the tooler (blue arrow) is pathing alone. By map reading, they find that the path east will most likely be bigger than the path south. They open south first to avoid taking risks and/or breaking gates and continue on their path:

Example 6:
This is the same situation as example 4 in 3.3. South of the keyer and tooler is the blue rectangle door. The tooler will teleport to the base and the keyer will be left alone for 2 large paths (north and east). Looking at the map, the east path will most likely be larger than the north one. The keyer decides to drop the group gatestone (and call “cgt east if gt”) and open the north door first.

The keyer gets lucky here and the north path was a dead end. If it wasn’t, the keyer would open the map, identify the path-sizes and decide then what to do next.
So, do small paths first before large paths if you are pathing alone (without the group gatestone) and do larger paths first if you are holding the group gatestone. If you are alone at multiple large paths, it would be beneficial to drop the group gatestone and do the smaller path(s) first.
3.5 The Critical Path
Identifying and predicting the critical path is one of the more challenging aspects of F2P Dungeoneering. But, if you can understand the behaviour of the critical path, you can save a lot of time during your floors and make predictions with high accuracy.
3.5.1 Basic Facts
1. In small floors the critical path is a connected line of 6-8* rooms which lead to the boss. In mediums, this number changes to 10-14* rooms and in larges, 19-23*.
*Boss and base included.
2. All bonus paths diverge from the critical path.
3. Keys found on the critical path can be bonus.
4. It is important to keep the Group gatestone on the critical path as much as possible because, due to its nature (the fact that it is a connected line of rooms), it cannot randomly hit a dead end. Since all bonus branches diverge off of the critical path, it is nice to have the group gatestone there so that these paths can be explored.
5. The experience given by the skill doors and rooms is the level of the door multiplied by 5 with 10 added to it. The equation would be: Experience = (5 x Level) + 10.
6. A critical path ends at a key or boss. Keys at the extreme corners or ends of a critical path are referred to as 'link keys' in this guide.
3.5.2 Critical Path Prediction
There are a few ways to identify the critical path. The first one is by skill doors.
1. Critical Path Prediction by Skill Doors
In F2P Dungeoneering, all skill requirements for a critical room will have an upper limit at the critical level for the skill (explained below), and a lower limit of 9 levels below the critical level. In F2P, skill requirements for doors/puzzles on the critical path are capped at level 49, meaning the critical level range is typically level 40-49, giving experience drops of 210-255 XP.
What is the critical level for a skill in any given party? This depends on the difficulty of the party. For 5:3, for example, the difficulty is 3. So, for any given skill in a 5:3 party, the critical level is the 3rd lowest level in the party from that skill. Typically, in 5:3, non-combat skill requirements on the critical path are level 40-49 (giving 210-255 XP), and combat skill requirements on the critical path are level 1 (giving 15 XP).
Method 1 of predicting the critical path based on skill doors is therefore by looking at the XP drop and seeing whether it falls into the critical XP range you have identified. If it is not within the critical XP range, then it is bonus. If it is within the critical XP range, it may be critical.
As of August 12, 2019, there is a second method of using skill doors to predict the critical path. Method 2 allows you to examine a skill door before opening it to see its level requirement. Then, you can identify whether the skill door is within the critical level range. If not, it is bonus. If so, it may be critical.
For an easy way to calculate and visualize the critical level and XP range for your party (as well as resources, which are discussed below), use this spreadsheet: https://goo.gl/SGiKLN
You can also read a more detailed explanation of calculating the critical level and XP range for any party size and difficulty by opening the spoiler below:
- Detailed Explanation:
- As mentioned, the critical level for any skill in F2P Dungeoneering is capped at 49, and the critical range will always be from the critical level (upper limit) to 9 levels below that (lower limit). So how do you find the critical level in a complicated party?
When the party difficulty is set to a:b (ex. 5:3, 5:5, 1:1, 2:1, etc.) then the critical experience will be designed for the bth lowest skill level on the team. This means that in a 5:3 floor, every skill will have a critical level as the 3rd lowest level on the team. Contrastingly, in a 5:5 floor, every skill will have a critical level as the 5th lowest level on the team, ie. the highest level.
Step 1 of finding the critical level range is to solve the bth lowest level in every skill, ie. the critical level. For a party such as 5:3, this is easy - the 3rd lowest level in every skill will typically be 1 for all combat skills (due to 3 skillers in the party), and 49+ for non-combat skills. For weirder party setups, or those setups where not enough people have high levels, this can become complicated.
Step 2 is subtracting 9 levels from the critical level to find the lower limit of the critical level range. In 5:3, the critical level for combat skills is usually 1; you cannot subtract 9 from this since it will result in a level requirement below 1 (which is impossible), so the range would just be 1. However, if you identified that level 49 is the critical level, then the range would be 40-49.
Step 3 is finding the critical XP using the critical level range. For each limit of the range, multiply the level by 5 and add 10 to find the XP drop. For example, a critical range of level 1 would yield XP drops of 15 XP (1 x 5 = 5, plus 10 = 15). A level range of 40-49 would yield XP drops of 210-255 XP (40 x 5 = 200, plus 10 = 210; 49 x 5 = 245, plus 10 = 255).
Usually, in a complex party, it is useful to focus on the skills that are not within the familiar ranges. For example, it is common for a 5:3 party to have a skiller that accidentally levelled some combat skills past 1. If, for example, a skiller in a 5:3 party has level 2 magic, the 3rd lowest Magic level will now be level 2, meaning the critical level is 2, the critical range is levels 1 to 2, and the critical XP drop will be 15-20 XP.
Note that the critical skill requirements can also appear on the bonus path. When you see experience outside of the critical ranges, however, it is guaranteed to be bonus.
2. Critical Path Prediction by Resource Tiers
Recall the definition of the critical level of a skill in any party: in a party with format a:b (ex. 5:3 or 5:5), the critical level in a skill is the bth lowest level in the party for that skill. Ex. In 5:3, the critical Mining level is the 3rd lowest Mining level in the party.
Using this concept, we can figure out what resources can NOT spawn on the critical path in any floor, allowing us to identify bonus rooms.
For an easy way to calculate and visualize the critical levels, XP, and resources for your party, use this spreadsheet: https://goo.gl/SGiKLN
1. Fishing spots: Find the critical Fishing and Cooking levels in the party. The 2 highest tiers of fish they have in common will be the only fish that can appear in fishing spots on the critical path. Ignore T6 fish (Web snippers) for the purposes of this calculation, as they will never spawn on the critical path in F2P.
- Examples:
- Ex. (Common - 2cb3sk and 5cb) Critical Fishing and Cooking level are both 40+, meaning only T4 and T5 fish (Giant flatfish & Short-finned eels) can appear on the critical path.
Ex. Critical Fishing is level 36 but critical Cooking is level 40+. You can fish up to T4 then, but cook up to T5. Thus, the 2 highest mutual tiers are T3 and T4, meaning Dusk eels and Giant flatfish are the only fish allowed to spawn on the critical path.
2. Dinosaurs: If the critical Fletching level in the party is 3 or higher, only Tier 1 dinosaurs (Protomastyx), which are pale yellow in colour, can appear on the critical path. This remains true (in F2P) even after Fletching has become F2P to 99.
It is important to remember that ANY dinosaurs can spawn on the critical path if the critical Fletching level is below 3.
3. Mining nodes: Rocks behave the same way as fish, except with more skills involved. You must look at 4 different skill combinations (below). The 2 highest mutual tiers of each combination separately will determine the only rocks that can appear on the critical path. Notes: If Attack and Strength combinations are at different tiers, it will always spawn the one that is higher and exclude the one that is lower. Ignore T6 rocks (Zephyrium) for purposes of all calculations, as they will never spawn on the critical path in F2P. The skill combinations are:
- Mining/Smithing-3/Attack (Warhammers)
- Mining/Smithing-8/Strength (Mauls/2hs)
- Mining/Smithing/Defence (Armour)
- Mining/Smithing/Ranged/Fletching-1 (Arrows)
- Examples:
- Ex. (Common - 2cb3sk 5:3) Critical Mining/Smithing levels are 40+, but critical Attack/Strength/Defence/Ranged are all 1 due to the use of skillers. Thus, all 4 skill combinations have a level at 1, meaning that ONLY Novite ores (Tier 1) can appear on the critical path.
Ex. (Common - 5cb 5:5) All critical stats in 5:5 will be based on the highest stats in the party. Thus, it's common that ALL critical skills will be 40+ in 5cb floors. In this case, the first skill combination will have Tier 4 and 5 as the highest mutual tiers. The same goes for the other 3 skill combinations. Thus, all combinations result in only Tier 4 (Kratonite) and Tier 5 (Fractite) ores being able to appear on the critical path.
Ex. (Complicated) Critical Mining/Attack levels are 40+, But critical Smithing is level 40. Fletching, Ranged and Defence are 21, and critical Strength is 1. With Mining/Attack at levels 40+/40+ but Smithing level at 40, Tier 3 and 4 will spawn on critical path instead of 4 and 5 because the Smithing level is not 43. Mining/Smithing/Ranged/Fletching/Defence at 40+/40/21/21/20 results in Tiers 2 and 3 being spawnable on the critical path. Normally, Tier 1 rocks would spawn because the critical Strength is 1, but since the Attack combination is higher than the Strength, Tier 1 rocks will not spawn. Overall Tiers 2, 3, and 4 can spawn on the critical path in this example.
4. Trees: If the critical Fletching level of the party is 8 or higher, trees work similarly to rocks. You must look at 3 different skill combinations (below). The 2 highest mutual tiers of each combination separately will determine the only trees that can appear on the critical path. Ignore T6 trees (Bovistrangler) for purposes of all calculations, as they will never spawn on the critical path in F2P. (As long as the critical Fletching level is 8 or higher). The skill combinations are:
- Woodcutting/Fletching-8/Magic (Wands/Staves)
- Woodcutting/Fletching-1/Ranged (Shortbows)
- Woodcutting/Firemaking
Note that there are other skills that trees depend on, but they are P2P skills and will always be level 1-5. This means that no matter what your party setup, T1 will always be one of the trees that spawns on the critical path.
- Example:
- Ex. (Common - 2cb3sk 5:3) Critical Woodcutting/Firemaking are 40+, but Magic/Ranged are level 1 (and Fletching is something 8+). The 2 highest mutual tiers between Woodcutting/Firemaking are T4 and T5 (Utuku/Spinebeam). Woodcutting/Fletching/Magic share T1 (Tangle gum), and the same when looking at Woodcutting/Fletching/Ranged. Thus, T1, T4, and T5 can appear on the critical path.
Ex. (Common - 5cb 5:5) All critical stats are 40+ (and Fletching 48+). Just like the example with rocks, then, Tiers 4 (Utuku) and 5 (Spinebeam) will be able to appear on the critical path. However, due to P2P skills like Hunter being capped at 1-5, Tier 1 (Tangle gum) can also appear on the critical path.
It is important to remember that ANY trees can spawn on the critical path if the critical Fletching level is below 8.
5. Wisps: Wisps do not follow a rule in F2P nor in P2P. You cannot recognize the bonus paths by the tiers of wisps found on your path.
Bonus can still do whatever it wants. Choose your combatants and skillers carefully if the party difficulty is set to less than the amount of players.
3. Advanced Critical Path Prediction by Map Analysis
- Because of the facts that the critical path is a connected line of rooms and that paths don’t cross, a bonus path can't be critical if it's identified as bonus once.
- The critical path always leads at some point to the base.
Here the start of the critical path is at the base:
Here, both the start and the end of the critical path are at the base:
This is the reason why the keyer prefers to keep base gate over the tooler. - The critical path does not turn much.

The critical path does turn directions, but usually goes straight if the map allows it to. This can be used for group gatestone movement in complex situations. For this reason a good idea would be (if the map allows) to take the group gatestone in the same general direction as the map is trending.
Here you can see at the black circles that the critical path rarely turns. Notice that at the end of the critical path, in this case, it does. This can be an indication of the boss (will be described later). Because the critical path doesn’t turn much, this often leads to the critical path going to the corners of the map. - Parallel (critical) paths tend to compete. It is rare to see two paths go in one direction, side by side, for an extended number of rooms. In general, the path with the most open space will cut off the other path.
- The critical path contains 19-23 rooms, including the base and the boss. Around 1/4 to 1/3 of the critical path are key doors (this ratio is lower on bonus paths). If you find yourself to be on a path with only a few key doors and you know you are on the critical path, the end of the critical path will have a lot of key doors. This is a good method to recognize the end of the critical path.
The fact that the critical path contains 19-23 rooms can also be used to estimate how far you are along the critical path. - The critical path tends to go to the corners of the map.

This is a very useful property, because it allows the combatants to predict, with a high degree of accuracy, the behaviour of the critical path. Here is another example:
- The critical path does not fork much. This can be used to ignore many bonus looking paths and is the reason why an efficient keyer can skip many doors confidently.
The critical path does not fork very often. But when it does, it can be identified due to the other properties of the critical path. This property can be used well for critical path prediction and gate placement. Here is a floor with 1 critical fork:
Here is one with 2:
- Critical paths end at the boss or at link keys. These link keys can be identified and can be used to find the next critical path.

Since critical paths tend to go to the corners of the maps, the link keys do as well. These keys ‘link’ to other critical paths or to the boss. If these keys can be found before their corresponding doors, plenty of time can be saved. The tooler should try to do the smaller critical paths to find these keys. This is a great property for critical path prediction as link keys can be identified easily by identifying the end of a critical path.
This is also the reason to discuss before the run whether you will be doing bonus or not. If the keyer is critical pathing and the tooler wants to bonus, the keyer can be slowed down by the tooler because of the link keys lagging behind. - The boss tends to be closer to the base and/or in a guaranteed dead end, mostly behind a key door.
The final critical path ends with the boss. So if you are near the end of the critical path and you have identified the critical path well, you can predict the boss’ location very accurately.
Near the base:
And here in a guaranteed dead end, near the base: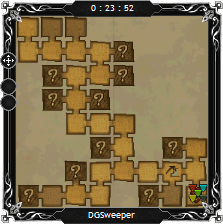


3.6 Bonus Pathing
3.6.1 Basic Facts
1. The reason why F2P Dungeoneers do not open all bonus doors is that they often run into P2P doors.
2. Pathing bonus is generally better XP/h than skipping it.
3. Keys found on bonus paths are guaranteed to be bonus keys.
4. The bonus path is not a connected line of rooms.
5. There are more bonus rooms than critical.
6. All skill requirements and resources can be found on the bonus path.
7. The more a bonus path turns and/or the further it gets from base or the critical path, the sooner it will end.
8. These rooms are always bonus in F2P: ramokee room, hunter ferret, jump lodestone, mining obstacles room and all P2P skills required rooms.
3.6.2 Increasing the XP/h
Small floors
In small dungeons, it is almost always worth doing bonus. It increases the XP/h by a lot and the floor time is relatively unaffected. The keyer should mainly try to stay on the critical path, as they do not have Law runes from the start. The tooler should do bonus only when they are done with their critical path, as it can make the link keys lag behind. Skillers can help as well for pathing in smalls.
Large floors
In large floors, it can be more complex deciding whether or not to do bonus. Generally, it is better XP/h. However, critical keys should not lag behind. For this reason the main focus should be on the critical path. Try to do bonus only when:
1. The critical path is a 1 way. Having 2 combatants do the same path won’t affect the speed by too much. The tooler should keep an eye on the map to see if the keyer needs their help (if they are at multiple paths or call them).
Example 7:
The path at the tooler is bonus. They decided to explore this path, as the critical path is a 1 way at this point.

Some moments later, the keyer called the tooler back as the critical path forked.

2. Another good moment to do bonus paths is when the other combatant is doing bonus. Doing bonus at the same time can be beneficial as keys found on the bonus path can connect to other bonus paths. Doing bonus at the same time will generally increase the XP/h.
3. Also do bonus paths when you are waiting/camping for link keys or for the group gatestone to be moved.
3.6.3 Guide Mode Floors
Turning the Guide Mode setting to ON will reveal the critical paths of a floor. The consequence is a 4 or 5% penalty to the final XP of a floor. You can toggle the setting in the normal party interface (accessed from your ring).
In Guide Mode floors, the critical path is highlighted on the map with a golden tinge, while bonus rooms appear faded and dark:
This presents DG'ers with the opportunity to know exactly which rooms lead to the boss, and which don't. Because the penalty is capped at 5%, this means that Guide Mode floors have plenty of room to be better XP/h than normal floors.
Using Guide Mode to boost XP/h boils down to your prioritization of doors. It is crucial you use the tips of prioritization for small and large floors listed above. Only then will using Guide Mode yield an increase in XP/h.
Keep in mind that simply opening all possible rooms isn't always the fastest XP/h. Bonus rooms are your secondary priority: only open the quick ones. Do not significantly delay the progression of the critical path.
4. Communication
Communication is important during floors. The keyer and tooler must be aware of each other's paths. Key doors should be called. Gates should be stated often and so should distinctions between critical and bonus rooms/paths. Slow rooms and upcoming keys should be mentioned as well. The keyer and tooler should update each other on their paths regularly.
Decisions should be stated as a fact or command. You will waste time asking “Should I gate <key door>?” When multiple people gate something, one person should state that they are (most likely) keeping the gate. When there are disputes in organization, the keyer has the final word, but do not expect the keyer to be the sole decision-maker: it is the tooler's responsibility as well to make logical decisions.
The keyer must be aware of what the second largest path is. The tooler, ideally, should be equally aware in case the group gatestone needs to be moved. If the keyer and tooler are unaware of each other’s paths, it will result in slow floor times. The keyer and tooler must be aware of each other’s paths.
5. Miscellaneous and Credits
5.1 Opening the map
As of August 2017, the map can be opened safely in combat, and will appear permanently on your screen (and update in real-time) until it is disabled by clicking the button again. Your eyes should glance at the map as often as possible without hindering your awareness of the chatbox and your path.
5.2 Risks of Map Prediction
Please note that predictions always have an uncertainty. This guide can help you predict what will most likely happen. There will always be exceptions.
For example, a good prediction based on path-size identification in the following situation is:

This is what happened:

For this reason, a good idea is to always keep a plan B while pathing.
5.3 Links to Guides
This guide was written with the help of the guides linked below.
1. DGS’ Map reading guide: http://www.xp-waste.com/map-reading-pathing-t1315.html
2. Warfare52’s Map predicting guide: http://services.runescape.com/m=forum/forums.ws?98,99,786,65639831
3. F2P Dungeoneering guide by Zerk: https://dgfamily.forumotion.com/t35-f2p-dungeoneering-guide-by-usedtobezerk-ooutdated-pre-eoc
4. F2P Dungeoneering guide for skillers by Person: https://dgfamily.forumotion.com/t1579-new-dungeoneering-guide-for-skillers
5. Dungeoneering Lingo by Redefinition (based on a prior thread by Nr): https://dgfamily.forumotion.com/t2715-dungeoneering-lingo
6. Puzzles by Sonic: https://dgfamily.forumotion.com/t8-dg-puzzles
5.4 Credits
Credit to DGS for publishing their guides, researches and DGSweeper.
Credit to Warfare52 for publishing his comprehensive map prediction guide.
Credit to Nr, UsedToBeZerk, Sonic and Person for publishing their F2P Dungeoneering guides.
Credit to Sonic for writing the keyer/tooler system section.
Credit to Yoodle, Juco, Oski, Nebhet and Minin Cape T for helping me take pictures of the map.
Credit to Amitie, Person and Bird Seed for helping me research dinos.
Credit to Ants The 3rd and Deerk for researching the behaviour of ores/trees on the critical path.
Credit to Redefinition for updating/rewriting the majority of the guide, and continuing to adapt it to game updates since 2015.
5.5 Last Words
Thanks for reading this guide. I hope my English wasn’t too bad and I want to thank everyone in the F2P and P2P Dungeoneering communities who have helped me progress in my Dungeoneering skills and write this guide.
Please post your feedback here: https://dgfamily.forumotion.com/t1605-feedback-to-dg-guide. Any feedback is appreciated.
6. Appendix
6.1 Appendix A: Video - Large run
To illustrate every aspect mentioned in this guide, I recorded myself doing a large run.
If you have any questions or suggestions regarding this guide, contact Redefinition.
Last edited by Khan on Fri Jul 03, 2015 2:46 pm; edited 82 times in total
Khan- V.I.P

- Posts : 193
Join date : 2013-03-24
![]()
![]()
Re: Guide to F2P Dungeoneering for Combaters
![]() by Nr Sat Jun 27, 2015 4:25 pm
by Nr Sat Jun 27, 2015 4:25 pm
This guide is now up to date. Several modifications to ensure the guide is up to date and flows logically have been made by Redefinition.
The latest version from 26th of July 2014 on archive.org.
and in BBCode in the spoiler below.
Edit: The Binds and Abilities section has been updated as of March 7th, 2016 to take into account new content made available to F2P (T50 weapons, new abilities, etc.). ~ Redefinition
Edit: A small section (3.6.3) has been added for Guide Mode floors. ~ Redefinition: August 2nd, 2016.
Edit: Various sections were updated to include the dynamic DG map, scroll of quick teleportation, Surge/Barge abilities, and new optimal binds due to the availability of the Duskweed orb and other off-hand weapons. ~ Redefinition: August 22nd, 2017.
Edit: Updated the sections on DG binds to replace T50 weaponry with newly accessible T60 counterparts. ~ Redefinition: October 11th, 2017.
Edit: Added some new information regarding the behaviour of ore/tree spawns on the critical path. Thanks to Ants the 3rd & Deerk for the research. ~ Redefinition: February 14th, 2018.
The latest version from 26th of July 2014 on archive.org.
and in BBCode in the spoiler below.
- here:
- Guide to F2P Dungeoneering
Table of Contents- Spoiler:
1. Introduction
2. Basics
[ 2.1 Requirements
[ 2.2 Party setup
[ 2.3 Binds and abilities
[ 2.4 The keyer/tooler system
3. Map reading and predicting
[ 3.1 Introduction
[ 3.2 Identifying map and path-sizes
[ 3.3 Gating and ggs movement
[ 3.4 Pathing
[ 3.5 The critical path
[ 3.6 Bonus pathing
4. Communication
5. Miscellaneous and credits
[ 5.1 Opening the map
[ 5.2 Risks of map prediction
[ 5.3 Record hunting
[ 5.4 Credits
[ 5.5 Last words
6. Appendix
[ Appendix A: Video - Large run
Glossary
2cb3sk = 2 combatants and 3 skillers (<6 combat)
5:3 = 5 team-members : difficulty 3
5:5 = 5 team members : difficulty 5
bo/bon/bonus = bonus path (path that doesn't lead to boss)
c6 = complexity 6
crit = critical path (path that leads to boss)
de,dewk,denk = dead end, dead end with key, dead and no key
gate/gs = personal gate/gatestone
gd = guardian door
ggs = group gatestone
gt = ggs teleport
bgt = buy gt
cgt = carry gt
mgt = move gt
n,e,s,w = north,east,south,west
br = blue rectangle
pco = purple corner
pp = purple pentagon
sd = silver diamond
1. Introduction
Dungeoneering is one of the more challenging skills in RuneScape. Over the years I’ve been dungeoneering both f2p and p2p and I’ve decided to share my experience in a written guide. This guide is written for the f2p dungeoneer who is familiar with the basic concepts of dungeoneering and who wants to increase his efficiency and speed in solving dungeoneering floors.
The main focus of this guide is on maximizing the dungeoneering xp/h. In order to maximize the xp/h you have to be familiar with pathing-, gating- and map-reading techniques. This guide will cover basic topics like binds, abilities, ggs and personal gatestone placement, pathing and map-reading as well as more advanced topics like critical pathing and map-predicting.
2. Basics
2.1 Requirements
The requirements to f2p dg as a cb are:
64+ mage for the group gatestone teleport.
49+ str/prayer and non-cb skills to be able to complete all doors and rooms on the crit path.
The requirements to f2p dg as a skiller are:
Cb level between 3-5. Some parties may accept higher cb skillers, but you will have difficulties finding a party.
2.2 Party setup
In f2p, the maximum xp/h can only be achieved by dungeoneering in a party setup with 2cb3sk 5:3 c6 no guide mode. Whether you do 5:3 or 5:5 is completely your choice. The xp/h on 5:5 is not far behind and floors will give more xp. This guide will mainly cover the party setups listed below:
Floor 1-29 : 2cb3sk 5:3/5:5 small c6 no guide mode [smalls]
Floor 30-35 : 2cb3sk 5:3/5:5 large c6 no guide mode [larges]
Other floor setups commonly hosted in F2P are:
5man 5:5 larges no guide mode (crit only or with some bonus for extra xp/h) - Any floor(s)
5man 5:5 13% larges no guide mode (completed for fun, record hunt or improvement in dungeoneering tehniques, never for xp) - Frozen floors
2.3 Binds and abilities
Magic has the highest DPS (Damage Per Second) on the majority of monsters in f2p. A suggested binds setup is the following one:
3 binds : Catalytic wand, Catalytic staff and Frac 2h/Spear.
4 binds : Catalytic wand, Catalytic staff, Frac 2h/Spear and Bryll top.
5 binds : Catalytic wand, Catalytic staff, Frac 2h/Spear, Bryll top and Bryll bottom.
For 5:5 dungeons it is better to stick to a staff and a 2h/spear with a defensive top (bryll/frac). The binds on EOC and Legacy don't differ.
Use catalytic wand for low level monsters and staff/2h on high level monsters and bosses.
Set Mystic Might and Overcharge as your quickprayers if you are using magic. If you are using melee Ultimate Strength and Incredible reflexes. Quickprayers speed up high level gds and bosses.
The correct order of abilities to build up adrenaline is: Auto-cast - Chain* - Wrack - Sonic Wave/Combust** - Wrack - Sonic Wave/Combust - Wrack - ...
By alternating Wrack with auto-casts (regular blast) and other abilities, high damage is dealt and adrenaline builds up efficiently.
*Try to use Chain as soon as possible in packed gds. Chain deals damage to surrounding monsters.
**Depending on the monster’s hp, use Sonic Wave to kill the monster or Combust to apply a damage-over-time effect.
Here is a setup of my ability bar:
Q: Freedom: Breaks free of any stuns or snares. Use this when you get bound by a mage.
W: Fire Blast: Right click and set this to autocast every floor to have an auto-cast ready. Alternate between auto-casts and abilities for the best DPS.
A: Wrack: Deals up to 125% spell damage and 157% damage against stunned opponents. Use this ability as your basic/alternating ability.
S: Chain: Deals damage to 2 additional targets for 100% of your spell damage. Try to use this ability as soon as possible in packed gds.
D: Sonic Wave: Deals 120% of your active spell's damage. Your next attack has a 10% bonus accuracy against the affected target. This ability can't be used with a wand.
F: Combust: Applies a damage overtime effect to the target, dealing 100-125% damage of the spell for 6 seconds. Use this spell if your target has a lot of hitpoints.
Z: Impact: Stuns and binds you target for a short time. Targets immune to stun suffer a 188% of your active spell's damage. Use this on targets immune to stun (most bosses).
X: Asphyxiate: A strong threshold ability that deals damage every 2 seconds for 6 seconds. This stuns your target. Use this ability on monsters who have a lot of hitpoints.
C: Omnipower: An ultimate ability which deals 200-400% damage of your spell. Use this when asphyxiate is recharging and your ability bar is full against a foe with high hp.
Keep in mind that the binds and ability section was written assuming optimal binds and combat stats.
2.4 The keyer/tooler system
In f2p dungeoneering, a typical party will consist of two combatants and three skillers. These two combatants have separate roles: one of them is the keyer, while the other is the tooler. The two combatants swap roles during the floor depending on who is holding the ggs.
A combatant takes the role of a keyer when he is holding the ggs. At the start of the floor the keyer is the leader (the red arrow on the map). Keyers are responsible for rushing straight out of base, gating home, and carrying the gt. Running and opening to doors on the critical path is their main priority. Because the most important aspect of the keyer is pathing speed, keyers should not waste time picking up keys, clearing GD's or doing puzzles unless it is crit, 1-way, or a solo path. Because keyers carry the gt, it is preferrable that they are the ones that find the boss, and drop the gt at the end ladder for skillers to end. The faster or more skilled combatant should be the keyer.
Because keyers rush straight out of home, having a cosmics bind and gating home is a must. If you need to teleport somewhere on a path, drop the gt, teleport home, and either pick up the laws that skillers made or use the ggs portal. Note that the keyer should not be the only one pathing. The tooler as well as the skillers should be responsible for running their own paths.
"Tooler" is derived from the pre-toolbelt days where combatants buy a toolkit and essence before leaving base. Nowadays, the tooler is more of an assisting role - instead of propagating the critical path, toolers mainly clear GD's and open up bonus paths. A combatant takes the role of a tooler when he's not holding the ggs. Due to the nature of bonus paths, it is especially important for toolers to quickly finish small branches before continuing the bonus path. Toolers are also responsible for picking up keys - the keyer rushes to the door while the tooler picks up a key. This not only speed things up, but is also necessary in awkward room layouts where there is a wall separating the door from the key.
Here the keyer (white square) rushes to the door and the tooler (green dot) picks up the key (red dot). The tooler can teleport to the keyer as he is holding the ggs.
Unless the dungeon is a one-way, toolers should almost never be on the same path as keyers. It is also preferred that toolers have either cosmics or laws bound, and create the type not bound at the start of each floor. Toolers should be gating key doors that are far from the keyer's path, critical rooms preferred. Don't forget to buy feathers! Again, the tooler should not be the only one doing GD's, puzzles, and picking up keys. The keyer is equally responsible should these show up on his own path.
A Note on Skillers
It is highly recommended that skillers take the initiative to tool the dungeon, after making laws. Skillers can do everything except magic, strength or guardian rooms. Skillers should path only when the boss is not found - if the boss is found, home teleport immediately and end via the ggs portal.
3. Map reading
3.1 Introduction
The map is the most important tool in helping you organize your team and predict what path to run next. The icons on the map represent the players, red is the 1st, blue 2nd, green 3rd, yellow 4th and grey 5th.
In general:
1. A path can have forks, but paths can never connect.
2. Paths tend to go straight and parallel paths tend to compete.
Paths tend to go straight:
And parallel paths tend to compete:
The path with the most open space will cut off the other path.
3. The chance for a path to reach a certain place depends on the number of minimal turns the path has to make to reach that place.
To reach the cross, the west path only needs to turn once while the east path has to turn twice. The chance the west path will reach the cross is therefore bigger than the chance the east path will.
In general, using the map allows the gt-holder to run the path which will most likely have the most doors. By having the gt on the largerst critical path, the paths around it will remain active and the gt will be moved less frequently. Generally, the gt should be carried on the largest critical path and the other teammates should branch out smaller paths of the map.
3.2 Identifying map and path-sizes
Map and path-sizes identification is crucial for gt placement. A good way of determining path-sizes is by analysing the total area a path can cover. By comparing these areas, a good prediction of the path lengths can be made. In this guide the keyer is the red arrow on the map and the tooler is the blue arrow.
Example 1:
Given this map:
Keeping in mind that paths tends to go straight and don’t cross, the north path will most likely be bigger than the south path. An example of a first prediction of the path-sizes would be:
For this reason it would be wise to take the gt north. This example makes clear that reading the map at the start of a floor is important. If the gt is on the correct spot at the start it could safe a mgt.
Example 2:
Here both the keyer and the tooler are on the same path. By map analysis, the south path is the only door going south at this point and will most likely be the bigger path. For this reason the keyer takes the gt south. An example of a good prediction of the path length is the following one:
Example 3:
Given this map:
Here the ggs should be at the keyer, as that will expand the most in this situation. It is easy to see that the tooler will most likely de soon. An example of a good prediction of the further expansion of the map would be the following one:
As parrallel paths tend to compete, paths tend to go straight and paths don’t cross.
By these example I hope to have made clear how important map reading can be for identifying path-sizes. The important things to remember for determining path sizes are:
1. Paths tend to go straight.
2. Paths don’t cross and parallel paths tend to compete.
3. The total size of the area the path can expand into.
3.3 Gating and ggs movement
Try to always have a gate. It's always better to have a gate placed than being free gate the entire floor. Both the keyer and tooler should show initiative to gate doors. The keyer should always try to keep a good gate as he is carrying the gt.
The gt should mainly be carried on the largest critical path. The keyer should keep his gate at base at the start of a floor. The tooler should regate at critical key doors far from base. The tooler should decide carefully when to regate from base.
Example 4:
Pco door is facing south and sd is facing north.
A few seconds later in the floor, pco key is found. Br is 2 east from base, facing south. Since the bigger critical path is east from base, I ask the tooler to go to pco. (This is a good example of why both cbers should start with base gate.)
Now the path of pco is done and the tooler can gt to the keyer. The 2 doors at the keyer are pp and gd, pp facing north. The tooler decides to regate pp and breaks sd and br. This was a good decision as sd and br were also gated by the keyer. Pp also is one of the few paths going north and for this reason will most likely cover a big part of the map.
So the gt is mainly used by the tooler, to teleport to an active path. The gt can also be used to cover parts of the map when both the cbers are not free gate. Try to keep the gt on the largest critical path, and your gates at critical key doors. The gt should be carried by the one who has the most important gate.
3.4 Pathing
The main thing about pathing is prioritization. By analysing the map you should determine what the larger and smaller (critical) paths are and open the larger paths first when holding the gt, and the smaller (critical) paths when you are not. If you are alone at multiple big paths when holding the gt, a good option is to drop the gt and run the smaller path first.
Bonus paths are usually smaller and do not branch much. So by opening the smaller paths in your area first, you can finish paths quickly and avoid taking risks or regating. Pathing bonus also increases the xp/h.
Example 5:
Here the tooler (blue arrow) is pathing alone. By map reading, he finds that the path east will most likely be bigger than the path south. He opens south first to avoid taking risks and/or breaking gates and continues his path:
Example 6:
This is the same situation as example 4 in 3.3. South of the keyer and tooler is br. The tooler will teleport to base and I will be left alone for 2 big paths (north and east). Looking at the map, the east path will most likely be bigger than the north one. I decided to drop the ggs (and call cgt east if gt) and open the north door first.
I got lucky here and north was a dead end. If it wasn’t, I would open the map, identify the path-sizes and decide then what I should do next.
So, do small paths first before large paths if you are pathing alone (without gt) and do bigger paths first if you are holding the ggs. If you are solo at multiple large paths, it would be beneficial to drop the ggs and do the smaller looking paths first.
3.5 The critical path
Identifying and predicting the critical path is one of the more challenging aspects of f2p dungeoneering. But if you can understand the behaviour of the critical path, you can safe a lot of time during your floors and make predictions a lot more accurately.
3.5.1 Basic facts
1. In small floors the critical path is a connected line of 6-8* rooms which lead to the boss. In medium floors 10-14* rooms and in larges 19-23*.
*Boss and base included.
2. All bonus paths diverge from the critical path.
3. Keys found on the critical path can be bonus.
4. It is important to keep the ggs on the critical path as much as possible, because due to its nature (the fact that it is a connected line of rooms) it cannot randomly hit a dead end, and since all bonus branches diverge off of it, it's nice to have the ggs there so that these paths can be opened and ran.
5. The experience given by the skill doors and rooms is the level of the door multiplied by 5 with 10 added to it. The equation would be: Exp = 5 * level + 10.
6. A critical path ends at a key or boss. Keys at the corners of a critical path are referred to 'link keys' in this guide.
3.5.2 Critical path prediction
There are a few ways to identify the critical path. The first one is by skill doors.
1. Critical path prediction by skill doors
In 5:5, all skill requirements in critical rooms will range from the highest level on the team to 9 levels under that, with a maximum of level 49 (in f2p). This means that anyone who has all f2p stats 49+ will receive critical xp in the range of 210-255*. This implies that if you get <210 or >255 xp in a skill door, you are on the bonus path.
If the party difficulty is set to a:b (i.e. a 5:3 floor) then the critical experiences will be designed for the bth lowest skill level on team [or the (a-b+1)th highest]. This means that in a 5:3 floor, the strength and magic requirements will be lvl 1 on the critical path with 3 skillers (15 xp).
*Note that these skill requirements can also appear on the bonus path.
2. Critical path prediction by resource tiers
Low level resources do not spawn on the critical path*. In 5:5, any path that spawns resources two tiers below the maximum tier that the highest leveled player can gather, is bonus. Another thing worth noting is that the criteria for a resource to be considered critical is also affected by other skills than the skill to gather the resource.
*wisps are an exception.
If the party difficulty is set to a:b (i.e. a 5:3 floor) then the critical resources will be designed for the bth lowest skill level on team [or the (a-b+1)th highest]. This means that in a 5:3 floor, atleast 3 team-members must have these required stats to spawn the resource:- Fish spots: Tier 1,2 and 3 fish do not appear on the critical path if 1 person has 40+ fishing and cooking in 5:5 and 3 persons in 5:3.
- Dinos: Tier 2,3,4,5 dinos do not appear on the critical path if 1 person has 3+ fletching in 5:5 and if 3 persons are in 5:3.
- Ores and trees: These 2 don’t work in f2p. All tiers of rocks and trees spawn on the critical path. This is most likely due to the requirement of p2p skills to spawn these resources.
- Wisps: Wisps do no follow this rule in both f2p and p2p. You cannot recognize the bonus paths by the tiers of wisps found on your path.
Bonus can still do whatever it wants. Choose your combatants and skillers carefully if the party difficulty is set to less than the amount of players.
3. Advanced critical path prediction by map analysis- Because of the facts that the critical path is a connected line of rooms and that paths don’t cross, a bonus path can't be critical if it's identified as bonus once.
- The critical path mostly leads at some point to the base. (this can be at the start as well)
Here the start of the critical path is at the base (2 enters):
Here the end of the critical path is at the base.
This is the reason why the keyer prefers to keep base gate over the tooler. - The critical path does not turn much.
The critical path does turn directions, but rather goes straight if the map allows it to. This can be used for gt movement in complex situations. For this reason a good idea would be (if the map allows) to take the ggs in the same direction as the previous door.
Here you can see at the black circles that the critical path rarely turns. Notice that at the end of the critical path in this case, it does. This can be an indication of the boss (will be described later). Because the critical path doesn’t turn much this often leads to the critical path going to the corners of the map. - Parallel (crit)paths tend to compete. It is rare to see two paths go in one direction, side by side, for an extended number of rooms. In general, the path with the most open space will cut off the other path.
- The critical path containts atleast 19 rooms and at max 23. Around 1/4th to a 1/3th of the critical path are key doors (this ratio is lower at bonus paths). If you find yourself to be on a path with only a few key doors and you know you are on the critical path, the end of the critical path will have a lot of key doors. This is a good method to recognize the end of the critical path.
The fact that the critical path containts atleast 19 and at max 23 rooms can also be used to estimate how far you are on the critical path. - The critical path tends to go to the corners of the map.
This is a very useful property, because it allows the combatants to predict with a lot of accuracy the behaviour of the critical path. Here is another example: - The critical path does not fork much. This can be used to ignore many bonus looking paths and is the reason why I risk a lot of enters in speed floors.
The critical path does not fork very often. But when it does, it can be identified due to the other properties of the critical path. This property can be used well for critical path prediction and gate placement. Here is a floor with 1 crit fork.
Here is one with 2: - Critical paths end at the boss or at link keys. These link keys can be identified and can be used to find the next critical path.
These keys are easy to identify as the critical path can be predicted with a lot of accuracy. Since critical paths tend to go to the corners of the maps, the link keys do as well. These keys ‘link’ to other critical paths or to the boss. If these keys can be find before the door, a lot of time, 2 mgts and a gate can potentially be saved. The tooler should try to do the smaller critical paths to find these keys and when the doors of these keys are found, there is a 100% chance the door will be critical. (if the key is 100% a link key). This is a great property for critical path prediction as link keys can be identified easily.
This is also the reason to discuss before the run whether you will be doing bonus or not. If the keyer is critical pathing and the tooler wants to bonus, the keyer can be slowed down by the tooler because of the link keys lagging behind. - The boss tends to be closer to base and/or in a de, mostly behind a key door.
The critical path ends with the boss. The boss likes to hide near base and/or in a de, mostly behind a key door. So if you are near the end of the critical path and you have identified the critical path well, you can predict the boss’ location very accurately.
Near base:
And here in a de, near base:
3.6 Bonus pathing
3.6.1 Basic facts
1. The reason why f2p dgers don't do all bonus (13%), is that bonus paths often lead to p2p doors (which can't be completed in f2p).
2. Pathing bonus is better xp/h than skipping it.
3. Keys found at bonus paths are bonus.
4. The bonus path is not a connected line of rooms.
5. There are more bonus rooms than critical.
6. All skill requirements (also p2p) and resources can be found on the bonus path.
7. The more a bonus path turns and/or the further it gets from base or the critical path, the sooner it'll die.
8. These rooms are always bonus in f2p: ramokee room, hunt ferret, jump lodestone, mining obstacles room and all p2p skills required rooms.
3.6.2 Increasing the xp/h
Small floors
In small dungeons it’s almost always worth doing bonus. It increases the xp/h by a lot and the floor time isn’t affected much. The keyer should mainly try to stay on the critical path, as he does not have laws from the start. The tooler should do bonus only when he’s done with his critical path, as it can make the link keys lag behind. Skillers can help as well for pathing in smalls.
Large floors
In large floors it can be more complex deciding to do bonus or not. Generally, it’s better xp/h. However, critical keys should not lag behind. For this reason the main focus should be on the critical path. Try to do bonus only when:
1. The critical path is a 1 way. Having 2 combatants do the same path won’t affect the speed by too much. Keep an eye on the map to see if the keyer needs your help (if he’s at multiple paths or calls you).
Example 7:
The path at the tooler is bonus. He decided to path it as the critical path is a 1 way at this point.
Some moments later I called him to gt as the critical path did fork.
2. Another good moment to do bonus paths is, if the other combatant is doing bonus. Doing bonus at the same time can be beneficial as keys found on the bonus path can connect to other bonus paths. Doing bonus at the same time won’t make the link keys lag behind and generally will increase the xp/h by a lot.
3. Also do bonus paths when you are waiting/camping. For link keys or for the ggs to be moved for example.
4. Communication
Communication is important during floors. The keyer and tooler must be aware of eachother's paths. Key doors should be called. Gates should be stated often and so should crit/bon. Slow rooms and upcoming keys should be mentioned as well. The keyer and tooler should update eachother on their paths regularly.
Decisions should be stated as a fact or command. You’ll waste time asking “Should I gate <key door>?” When multiple people gate something, one person should state that they are (most likely) keeping the gate. When there are disputes in organization, the keyer has the final word. But do not expect the keyer to organize the team, it's the tooler's responsibility as well to make decisions.
Especially if you are holding the ggs you have to be aware of what the 2nd biggest (critical) path is. As the tooler you should be aware of the size of your paths as well and should be ready to mgt if you see that the keyer’s path turns unfavourable. If the keyer and tooler aren’t aware of eachother’s paths it will result in slow floor times as the keyer might go run the tooler’s path if he’s stuck. Or he will run bonus when he’s not supposed to for example. The keyer and tooler must be aware of eachother’s paths.
5. Miscellaneous and credits
5.1 Opening the map
With the arrival of the eoc it’s harder to open map inbetween attacks. Good moments to open the map are:
1. While opening skill doors - map will not autoclose due to combat, use this to your advantage.
2. While teleporting - map will not autoclose due to combat, use this to your advantage.
3. While running in a direction - don't open map while clicking on a door or object as this will interrupt your movement.
5.2 Risks of map prediction
Please note that predictions always have an uncertainty. This guide can help you predict what most likely is going to happen. But it does happen that the critical path unexpectedly turns or the critical path forks a lot more than usual.
For example, a good prediction based on path-size identification in the following situation is:
This is what happened:
lol
For this reason, a good idea is to always keep a plan B while pathing (what should I do if I bon/de). Personally I identify the situation, make a prediction, make a decision, and keep a plan B when I path.
You've mastered map prediction, once you realize you can't.
5.3 Links to guides
This guide was written with the help of the guides linked below.
1. DGS’ Map reading guide: http://www.xp-waste.com/map-reading-pathing-t1315.html
2. Warfare52’s Map predicting guide: http://services.runescape.com/m=forum/forums.ws?150,151,672,63585439
3. F2P dungeoneering guide by Zerk: https://dgfamily.forumotion.com/t35-f2p-dungeoneering-guide-by-usedtobezerk-ooutdated-pre-eoc
4. F2P Dungeoneering guide for skillers by Person: https://dgfamily.forumotion.com/t1579-new-dungeoneering-guide-for-skillers
5. Abbreviations by Nr: https://dgfamily.forumotion.com/t1574-dungeoneering-abbreviations
6. Puzzles by Sonic: https://dgfamily.forumotion.com/t8-dg-puzzles
5.4 Credits
Credits to DGS for publishing their guides, researches and Dgsweeper.
Credits to Warfare52 for publishing his comprehensive map prediction guide.
Credits to Nr, UsedToBeZerk, Sonic and Person for publishing their f2p dungeoneering guides.
Credits to Sonic for writing the keyer/tooler system section.
Credits to Yoodle, Juco, Oski, Nebhet and Minin cape T for helping me take pictures of the map.
Credits to Amitie, Person and Bird Seed for helping me research dinos.
5.5 Last words
Thanks for reading this guide. I hope my english wasn’t too bad and I want to thank everyone in the f2p and p2p dungeoneering community who has helped me progress in my dungeoneering skills and who has helped me with writing this guide.
Please post your feedback here: https://dgfamily.forumotion.com/t1605-feedback-to-dg-guide. Any feedback is appreciated.
6. Appendix
6.1 Appendix A: Video - Large run
To illustrate every aspect mentioned in this guide, I recorded myself doing a large run.
Edit: The Binds and Abilities section has been updated as of March 7th, 2016 to take into account new content made available to F2P (T50 weapons, new abilities, etc.). ~ Redefinition
Edit: A small section (3.6.3) has been added for Guide Mode floors. ~ Redefinition: August 2nd, 2016.
Edit: Various sections were updated to include the dynamic DG map, scroll of quick teleportation, Surge/Barge abilities, and new optimal binds due to the availability of the Duskweed orb and other off-hand weapons. ~ Redefinition: August 22nd, 2017.
Edit: Updated the sections on DG binds to replace T50 weaponry with newly accessible T60 counterparts. ~ Redefinition: October 11th, 2017.
Edit: Added some new information regarding the behaviour of ore/tree spawns on the critical path. Thanks to Ants the 3rd & Deerk for the research. ~ Redefinition: February 14th, 2018.

Nr- Forum Administrator / L0lf2p General

- Posts : 2222
Join date : 2012-02-05
Age : 66 -

![]()
![]()
![]()


Page 1 of 1
Permissions in this forum:
You cannot reply to topics in this forum|
|
|